
🚀 实战进阶:将 ComfyUI 封装为 AI 视频生成网站 (FastAPI + WebUI)
背景: 在上一篇文章中,我们已经在 Ubuntu 服务器 (RTX 4090) 上成功部署了 ComfyUI 并跑通了 Wan2.1 文生视频工作流。 但 ComfyUI 原生界面太复杂,不适合直接丢给最终用户使用。
目标: 我们要构建一个**“业务网关”**,包含:
- 后端 (FastAPI):封装 ComfyUI 的 API,将复杂的 ComfyUI 工作流封装为干净、标准的 RESTful API,供上游服务 (如RuoYi) 调用。
- 运行环境: 独立 Python
venv(fastapi_venv) - 前端 (HTML/JS):提供一个清爽的 Web 界面,用户只需输入提示词即可生成视频。
- 依赖服务: ComfyUI AI 引擎 (必须在
http://127.0.0.1:8188运行) - 架构:用户访问 -> FastAPI (9000端口) -> 内部转发 -> ComfyUI (8188端口)。
🛠️ 第一步:准备独立环境
为了保证环境纯净,我们不要复用 ComfyUI 的 venv,而是为 FastAPI 创建一个独立的虚拟环境。
-
创建并激活环境
Bash
cd ~/My-ComfyUI python3 -m venv fastapi_venv source fastapi_venv/bin/activate -
安装依赖
Bash
pip install "fastapi[all]" uvicorn requests -i https://pypi.tuna.tsinghua.edu.cn/simple
📂 第二步:导出 API 工作流 (“菜谱”)
FastAPI 需要知道如何“指挥” ComfyUI。我们需要将工作流导出为 JSON 模板。
- 打开 ComfyUI 界面 (
http://服务器IP:8188)。 - 加载 T2V 工作流:确保这是您调试通过的、包含 “Save Video” 节点的工作流。
- 注意:必须有 Save Video 节点,否则 FastAPI 无法捕获结果文件。
- 导出 API 格式:
- 点击右侧菜单的 “Save (API format)” 按钮。
- 下载 JSON 文件。
- 上传服务器:
- 将文件重命名为
t2v_api.json。 - 上传到服务器的
~/My-ComfyUI/目录下。
- 将文件重命名为
💻 第三步:编写后端代码 (api_server.py)
在 ~/My-ComfyUI/ 目录下创建 api_server.py。 这段代码实现了:
- 静态文件托管:让用户访问
http://IP:9000就能看到网页。 - API 转发:接收前端请求,注入提示词,调用 ComfyUI。
- 结果解析:智能解析 ComfyUI 复杂的输出路径,返回真实 URL。
Python
import uvicorn
import requests
import json
import uuid
from fastapi import FastAPI
from pydantic import BaseModel
from fastapi.middleware.cors import CORSMiddleware # 允许 RuoYi 前端跨域

# (!!!) 新增下面这一行导入 (!!!)
from fastapi.staticfiles import StaticFiles
from fastapi.responses import HTMLResponse

app = FastAPI()

# --- CORS 跨域设置 ---
# 允许所有来源 (生产环境您应该改成 RuoYi 的前端地址)
app.add_middleware(
    CORSMiddleware,
    allow_origins=["*"],
    allow_credentials=True,
    allow_methods=["*"],
    allow_headers=["*"],
)

# (!!!) 新增以下代码 (!!!)

# 1. 挂载静态文件目录,这样前端才能访问 static 里的资源
app.mount("/static", StaticFiles(directory="static"), name="static")

# 2. 添加根路由,直接返回 index.html
@app.get("/", response_class=HTMLResponse)
async def read_root():
    with open("static/index.html", "r", encoding="utf-8") as f:
        return f.read()


# --- ComfyUI 配置 ---
COMFYUI_URL = "http://127.0.0.1:8188"
# (!!!) 新增此行 (!!!)
# 请将 [YOUR_SERVER_IP] 替换为您的公网 IP 或域名
PUBLIC_FACING_URL = "http://127.0.0.1:8188" # 返回给 RuoYi 时使用
# 启动时加载 API 工作流模板
try:
    with open("text_to_video_wan.json", "r", encoding="utf-8") as f:
        API_WORKFLOW_TEMPLATE = json.load(f)
    print("text_to_video_wan 加载成功。")
except FileNotFoundError:
    print("错误:text_to_video_wan.json 未找到!")
    API_WORKFLOW_TEMPLATE = None

# --- Pydantic 模型定义 ---
class T2VRequest(BaseModel):
    prompt: str
    negative_prompt: str = "low quality, worst quality, bad quality"

# --- 辅助函数:定位提示词节点 ---
def find_prompt_node_id(workflow_template):
    """在工作流 JSON 中自动查找 CLIP Text Encode 节点的 ID"""
    for node_id, node_data in workflow_template.items():
        if node_data.get("class_type") == "CLIP Text Encode (Simple)":
            # 假设第一个找到的是我们的目标
            return node_id, "positive" # "positive" 是该节点的输入字段名
        if node_data.get("class_type") == "CLIPTextEncode":
            # 兼容 ComfyUI 原生节点名
            return node_id, "text"
    return None, None # 如果找不到

# 动态查找 Positive 提示词节点的 ID 和字段
POSITIVE_NODE_ID, POSITIVE_FIELD_NAME = find_prompt_node_id(API_WORKFLOW_TEMPLATE)
if POSITIVE_NODE_ID:
    print(f"自动定位到 Positive 提示词节点 ID: {POSITIVE_NODE_ID}, 字段: {POSITIVE_FIELD_NAME}")
else:
    print("警告:无法自动定位 Positive 提示词节点!")


# --- API 端点 ---

@app.post("/api/v1/generate-video")
def queue_generation(request: T2VRequest):
    """
    1. 接收 RuoYi 的请求,排队任务
    2. 返回任务 ID
    """
    if not API_WORKFLOW_TEMPLATE:
        return {"error": "服务器工作流模板未加载"}, 500

    if not POSITIVE_NODE_ID:
        return {"error": "服务器工作流配置错误,找不到提示词节点"}, 500

    # 1. 复制模板并注入提示词
    workflow = API_WORKFLOW_TEMPLATE.copy()
    workflow[POSITIVE_NODE_ID]["inputs"][POSITIVE_FIELD_NAME] = request.prompt

    # (可选) 注入负面提示词 (需要您自己找到负面节点的 ID)
    # workflow["NEGATIVE_NODE_ID"]["inputs"]["text"] = request.negative_prompt

    # 2. 准备 payload
    client_id = str(uuid.uuid4())
    payload = {"prompt": workflow, "client_id": client_id}

    # 3. 调用 ComfyUI 的 /prompt 接口
    try:
        response = requests.post(f"{COMFYUI_URL}/prompt", json=payload)
        response.raise_for_status()
        data = response.json()

        if 'prompt_id' not in data:
            return {"error": "ComfyUI 未返回 prompt_id", "details": data}, 500

        return {
            "status": "queued",
            "task_id": data['prompt_id']
        }

    except requests.RequestException as e:
        return {"error": f"调用 ComfyUI 失败: {str(e)}"}, 503


@app.get("/api/v1/status/{task_id}")
def get_task_status(task_id: str):
    """
    1. 接收 RuoYi 的轮询请求
    2. 检查 ComfyUI 的 /history 接口
    3. (最终修正版) 查找 'outputs' -> 'node' -> 'images' -> list -> 'filename' & 'subfolder'
    """
    try:
        # 1. 调用 ComfyUI 的 /history 接口
        response = requests.get(f"{COMFYUI_URL}/history/{task_id}")
        response.raise_for_status()
        data = response.json()

        # 2. 检查 history
        if task_id not in data:
            # 任务还在队列中,尚未开始执行
            return {"status": "pending"}

        history = data[task_id]

        # 3. 检查是否有错误
        if 'status' in history and history['status'].get('exception'):
            return {"status": "error", "message": history['status']['exception'][1]}

        # 4. 检查是否已完成
        if 'outputs' in history:
            outputs = history['outputs']
            video_files = []

            # 遍历所有节点的输出 (outputs.values() 会返回 "50": {...} 里的内容)
            for node_output in outputs.values():

                # 这是我们从您的 JSON 中找到的精确路径
                if 'images' in node_output:
                    for image_data in node_output['images']:
                        # 确保这是一个已保存的 "output" 类型文件
                        if image_data.get('type') == 'output':
                            filename = image_data.get('filename')
                            subfolder = image_data.get('subfolder')

                            if filename:
                                # 构建 ComfyUI /view 接口能识别的 URL
                                video_url = f"{PUBLIC_FACING_URL}/view?filename={filename}&type=output"

                                # 如果有子目录,必须加上 subfolder 参数
                                if subfolder:
                                    video_url += f"&subfolder={subfolder}"

                                video_files.append(video_url)

            if video_files:
                # 去重,以防万一
                unique_video_files = list(set(video_files))
                return {
                    "status": "complete",
                    "video_urls": unique_video_files
                }
            else:
                # 如果还是没找到 (几乎不可能了),返回一个错误
                return {"status": "complete_no_files_found_in_history_FINAL"}

        # 5. 如果都对不上,说明还在运行
        return {"status": "running"}

    except requests.RequestException as e:
        return {"error": f"调用 ComfyUI 失败: {str(e)}"}, 503


if __name__ == "__main__":
    print("启动 FastAPI 服务器在 0.0.0.0:9000")
    uvicorn.run(app, host="0.0.0.0", port=9000)
关键配置项 (api_server.py)
在 api_server.py 文件的顶部,有两个关键配置项需要您根据环境修改:
COMFYUI_URL- 用途: FastAPI 内部调用 ComfyUI 引擎的地址。
- 值:
http://127.0.0.1:8188 - 备注: 必须使用
127.0.0.1,确保服务间走内网通信,效率最高。
PUBLIC_FACING_URL- 用途: 在
GET /status/{task_id}接口返回给调用方 (RuoYi) 的 URL 中,用于拼接视频地址。 - 值:
http://[YOUR_SERVER_IP]:8188或https://[YOUR_DOMAIN.COM] - 备注: 这里必须填写服务器的公网 IP 或域名,否则 RuoYi 前端将无法访问视频。
- 用途: 在
🎨 第四步:编写前端页面 (static/index.html)
- 创建目录:
mkdir -p ~/My-ComfyUI/static - 创建文件:
nano ~/My-ComfyUI/static/index.html - 粘贴以下极简风格的代码:
HTML
<!DOCTYPE html>
<html lang="zh-CN">
<head>
    <meta charset="UTF-8">
    <meta name="viewport" content="width=device-width, initial-scale=1.0">
    <title>Wan2.1 视频生成工坊</title>
    <style>
        :root { --primary: #2563eb; --bg: #f8fafc; --card: #ffffff; }
        body { font-family: 'Segoe UI', sans-serif; background: var(--bg); color: #1e293b; display: flex; justify-content: center; padding: 40px 20px; }
        .container { width: 100%; max-width: 600px; background: var(--card); padding: 30px; border-radius: 16px; box-shadow: 0 10px 25px rgba(0,0,0,0.05); }
        h1 { margin-top: 0; font-size: 24px; color: #0f172a; text-align: center; margin-bottom: 30px; }

        .form-group { margin-bottom: 20px; }
        label { display: block; margin-bottom: 8px; font-weight: 600; font-size: 14px; }
        textarea { width: 100%; height: 100px; padding: 12px; border: 2px solid #e2e8f0; border-radius: 8px; font-size: 16px; resize: vertical; transition: border 0.2s; box-sizing: border-box;}
        textarea:focus { border-color: var(--primary); outline: none; }

        button { width: 100%; padding: 14px; background: var(--primary); color: white; border: none; border-radius: 8px; font-size: 16px; font-weight: 600; cursor: pointer; transition: opacity 0.2s; }
        button:hover { opacity: 0.9; }
        button:disabled { background: #94a3b8; cursor: not-allowed; }

        .status-box { margin-top: 20px; padding: 15px; background: #f1f5f9; border-radius: 8px; font-size: 14px; display: none; }
        .status-box.active { display: block; }
        .loader { display: inline-block; width: 12px; height: 12px; border: 2px solid #64748b; border-radius: 50%; border-top-color: transparent; animation: spin 1s linear infinite; margin-right: 8px; }
        @keyframes spin { to { transform: rotate(360deg); } }

        .video-result { margin-top: 20px; display: none; }
        video { width: 100%; border-radius: 8px; box-shadow: 0 4px 6px -1px rgba(0, 0, 0, 0.1); }
        .download-link { display: block; text-align: center; margin-top: 10px; color: var(--primary); text-decoration: none; }
    </style>
</head>
<body>

<div class="container">
    <h1>🎬 Wan2.1 文生视频工坊</h1>

    <div class="form-group">
        <label for="prompt">提示词 (Prompt)</label>
        <textarea id="prompt" placeholder="例如:An astronaut walking on the moon, cinematic lighting, 4k">An astronaut walking on the moon</textarea>
    </div>

    <button id="generateBtn" onclick="startGeneration()">✨ 开始生成视频</button>

    <div id="statusBox" class="status-box">
        <span class="loader" id="loader"></span>
        <span id="statusText">准备就绪</span>
    </div>

    <div id="videoContainer" class="video-result">
        <label>生成结果:</label>
        <video id="videoPlayer" controls loop autoplay muted></video>
        <a id="downloadLink" href="#" target="_blank" class="download-link">下载视频</a>
    </div>
</div>

<script>
    // 这里填写您的 FastAPI 地址 (如果就在当前页面访问,留空或者是相对路径即可)
    // 由于我们是同源托管,直接用相对路径 "/api/v1"
    const API_BASE = "/api/v1";

    let checkInterval = null;

    async function startGeneration() {
        const prompt = document.getElementById('prompt').value;
        if (!prompt) return alert("请输入提示词!");

        // UI 重置
        const btn = document.getElementById('generateBtn');
        const statusBox = document.getElementById('statusBox');
        const statusText = document.getElementById('statusText');
        const videoContainer = document.getElementById('videoContainer');
        const loader = document.getElementById('loader');

        btn.disabled = true;
        btn.innerText = "生成中...";
        statusBox.classList.add('active');
        videoContainer.style.display = 'none';
        loader.style.display = 'inline-block';
        statusText.innerText = "正在提交任务...";

        try {
            // 1. 提交任务
            const res = await fetch(`${API_BASE}/generate-video`, {
                method: 'POST',
                headers: { 'Content-Type': 'application/json' },
                body: JSON.stringify({ prompt: prompt })
            });

            const data = await res.json();
            if (data.error) throw new Error(data.error);

            const taskId = data.task_id;
            statusText.innerText = `任务已提交 (ID: ${taskId.slice(0,8)}...),正在排队...`;

            // 2. 开始轮询
            checkInterval = setInterval(() => checkStatus(taskId), 3000);

        } catch (e) {
            showError(e.message);
        }
    }

    async function checkStatus(taskId) {
        const statusText = document.getElementById('statusText');

        try {
            const res = await fetch(`${API_BASE}/status/${taskId}`);
            const data = await res.json();

            if (data.status === 'running') {
                statusText.innerText = "🚀 AI 正在努力生成中... (这可能需要几十秒)";
            } else if (data.status === 'pending') {
                statusText.innerText = "⏳ 正在排队等待 GPU 资源...";
            } else if (data.status === 'complete') {
                clearInterval(checkInterval);
                showSuccess(data.video_urls[0]);
            } else if (data.status === 'error') {
                clearInterval(checkInterval);
                showError(data.message || "生成失败");
            }
        } catch (e) {
            clearInterval(checkInterval);
            showError("网络连接错误");
        }
    }

    function showSuccess(url) {
        const btn = document.getElementById('generateBtn');
        const statusText = document.getElementById('statusText');
        const loader = document.getElementById('loader');
        const videoContainer = document.getElementById('videoContainer');
        const videoPlayer = document.getElementById('videoPlayer');
        const downloadLink = document.getElementById('downloadLink');

        btn.disabled = false;
        btn.innerText = "✨ 再生成一个";
        loader.style.display = 'none';
        statusText.innerText = "✅ 生成完成!";

        videoPlayer.src = url;
        downloadLink.href = url;
        videoContainer.style.display = 'block';
    }

    function showError(msg) {
        const btn = document.getElementById('generateBtn');
        const statusText = document.getElementById('statusText');
        const loader = document.getElementById('loader');

        clearInterval(checkInterval);
        btn.disabled = false;
        btn.innerText = "重试";
        loader.style.display = 'none';
        statusText.innerText = "❌ 错误: " + msg;
    }
</script>

</body>
</html>
整体文件结构
服务部署在 ~/My-ComfyUI 目录下:
Bash
~/My-ComfyUI/
├── api_server.py           # (核心) FastAPI 服务的主代码
├── t2v_api.json            # (核心) ComfyUI 导出的 API 格式工作流 "菜谱"
├── fastapi_venv/           # (环境) FastAPI 专用的 Python 虚拟环境
├── ComfyUI/                # (依赖) ComfyUI 引擎的完整目录
├── static/                 # (前端) FastAPI前端页面
└── venv/                   # (环境) ComfyUI 专用的 Python 虚拟环境
🚀 第五步:部署与运行
整体文件结构
Bash
~/My-ComfyUI/
├── api_server.py           # (核心) FastAPI 服务的主代码
├── t2v_api.json            # (核心) ComfyUI 导出的 API 格式工作流 "菜谱"
├── fastapi_venv/           # (环境) FastAPI 专用的 Python 虚拟环境
├── ComfyUI/                # (依赖) ComfyUI 引擎的完整目录
├── static/                 # (前端) FastAPI前端页面
└── venv/                   # (环境) ComfyUI 专用的 Python 虚拟环境
此服务与 ComfyUI 引擎一样,也需要使用 screen 在后台持久化运行。
-
进入 Screen 会话
Bash
screen -S fastapi -
启动服务
Bash
cd ~/My-ComfyUI source fastapi_venv/bin/activate # 别忘了激活环境 python api_server.py -
停止 / 重启服务 (最常用)
您需要更新代码 (如 api_server.py) 或工作流 (如 t2v_api.json) 时,必须重启此服务。
-
“重连”到
fastapi会话:Bash
screen -r fastapi -
您会看到正在滚动的日志。按
Ctrl + C停止当前服务。 -
重新启动服务:
Bash
# (此时应仍在 venv 中) python api_server.py -
验证与脱离
- 如果你看到
Uvicorn running on http://0.0.0.0:9000,说明启动成功。 - 按
Ctrl + A,然后松开,再按D,让它在后台运行。
- 如果你看到
如何更新 AI 工作流
当您想调整 ComfyUI 的参数(例如更换模型、修改步数)时,必须同时更新此服务:
- 在 ComfyUI (浏览器):
- 打开
http://[服务器IP]:8188。 - 加载您的工作流,进行修改(例如,更换 KSampler 的步数)。
- 确保最后一步的 “Save Video” 节点被正确连接。
- 点击 “Save (API format)”,下载新的
.json文件。
- 打开
- 在服务器 (终端):
- 将新下载的
.json文件上传到~/My-ComfyUI/目录。 - 覆盖(或替换)掉旧的
t2v_api.json文件。
- 将新下载的
- 重启 FastAPI 服务:
- 按照 4.3 中的步骤(
screen -r fastapi->Ctrl+C->python api_server.py…)重启服务。 - FastAPI 服务只在启动时加载一次
t2v_api.json,因此必须重启才能使新工作流生效。
- 按照 4.3 中的步骤(
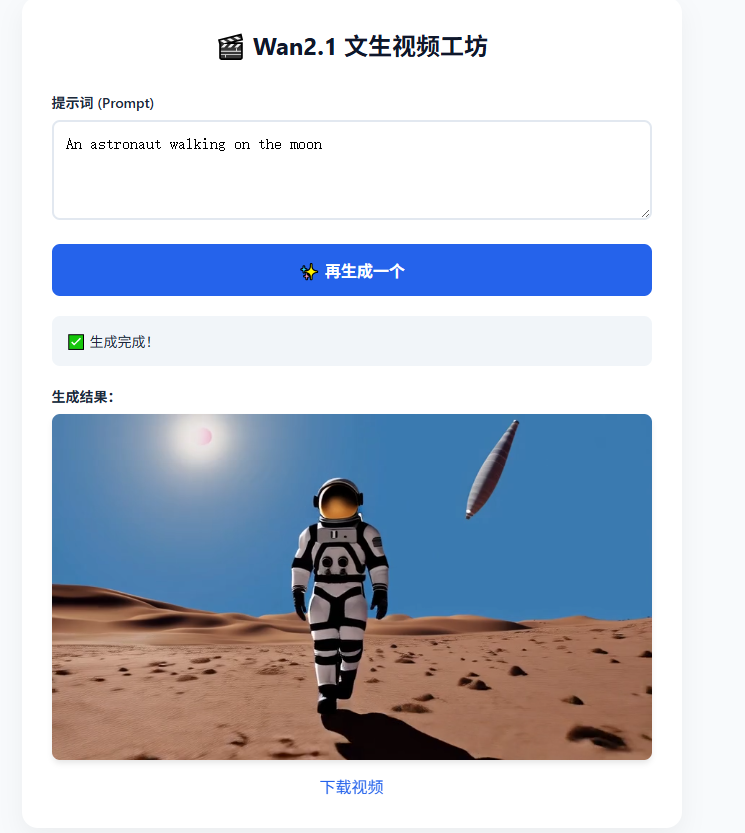
🎉 最终效果
现在,打开您的浏览器,访问: http://[您的服务器IP]:9000
您将看到一个简洁的 AI 视频生成页面。输入提示词,点击生成,喝口水,视频就出来了!
🔧 运维小贴士
- 我要修改视频时长/步数怎么办?
- 在 ComfyUI 浏览器界面修改参数。
- 重新导出
t2v_api.json并覆盖服务器上的文件。 screen -r fastapi->Ctrl+C->python api_server.py(重启 FastAPI 才能加载新配置)。
- 视频无法播放? 请检查
api_server.py中的PUBLIC_FACING_URL是否填写了正确的公网 IP。