apidoc自动生成接口文档
本文以接口文档分享的需求为契机,讲述对apidoc技术的应用与源码的改动。
需求分析
- 在umeapi接口管理平台增加接口文档的功能。(读取平台上的数据,便于用户分享)
- 单接口分享
- 整个工程接口分享
- 文档可以进行对历史版本进行对比。
- 请求和响应的参数增加mock值等等
技术选型方案
- Swagger:可以导出api的json格式,强依赖Java项目运行,不支持离线文档功能
- knife4j:根据标准规范,生成的在线markdown离线文档,开发者可以进行拷贝生成markdown接口文档,通过其他第三方markdown转换工具转换成html或pdf
- YApi:支持常用的接口管理功能,提供了权限管理、Mock数据、Swagger数据导入和API接口导出静态文本格式,在线接口测试和切换配置环境
- APIDOC:提供IDEA和VS code插件,支持大部分开发语言,跨平台,很方便扩展;支持多个不同语言的多个项目生成一份文档;输出模板可自定义;根据文档生成 mock 数据;
综上分析对比,APIDOC对业务代码无侵入、无需运行java代码即可生成文档、模板自定义、页面美观,故选择APIDOC技术实现。
技术实现
springboot使用apidoc
apidoc是基于注释来生成文档的,它不基于任何框架,而且支持大多数编程语言。
1、安装node.js环境,不做介绍,网上有很多。
2、指定apidoc版本的安装。(也可以安装最新版,但我新版遇到了问题降版本解决的。)
npm install apidoc@0.28.1 -g
只需要一条apidoc就已经安装完成了,安装的目录在你node_modules中。(我的路径/usr/local/lib/node_modules/apidoc/
默认全局安装,如果想安装到项目中,这样可以在另一个环境下,
npm install就可以下载有所有依赖包npm install apidoc –save-dev/-D
3、测试一个demo
随便写个函数,上面加个注释。
1
2
3
4
5
6
7
8
9
10
11
12
13
14
15
public class ApiDocDemo {
/**
* @apiVersion 1.0.0
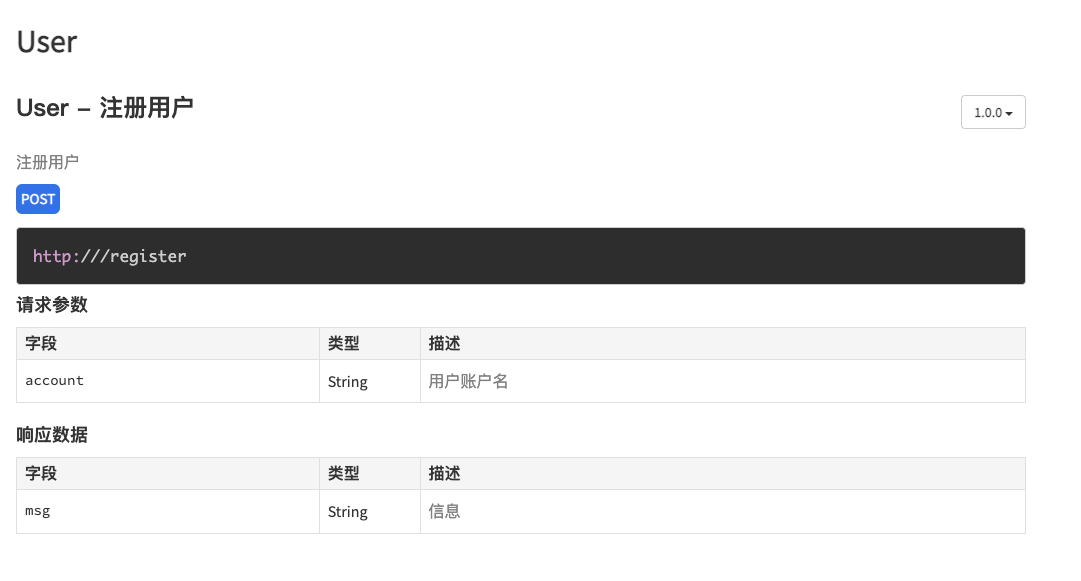
* @api {post}{POST} /register 注册用户
* @apiGroup User
* @apiDescription 注册用户
* @apiSampleRequest off
* @apiParam (请求参数) {String} account 用户账户名
* @apiSuccess (响应数据) {String} msg 信息
*
*/
public void doc() {
return doc();
}
}
4、根目录配置apidoc.json文件
1
2
3
4
5
6
7
8
9
10
11
12
13
14
15
16
17
18
19
20
21
22
23
24
25
{
  "name": "apidoc-demo",
  "version": "1.0.0",
  "description": "",
  "main": "index.js",
  "author": "Eve",
  "license": "MIT",
  "apidoc": {
    "name": "UmeApi接口文档demo", //文档名称
    "description": "You write something here to describe your project", //文档描述
    "title": "The title of this doc", // 形成的浏览器页面标题
    "url": "http://", //api的前缀路径
    "sampleUrl": "http://localhost:3300", // 页面测试api请求的url前缀,会覆盖useHostUrlAsSampleUrl - 这个配置项不设置的话,内部的@apiSampleRequest设置也不起作用

    //api-name排序或者group-name排序, 先进行group排序-再进行name排序, 没有的则自动在后面显示
    "order":[
    ],
    "template": {
    "forceLanguage": "zh_cn",// 生成apidoc的默认语言,默认zh_cn(中文简体)
    "withCompare": true,// 是否需要进行版本对比,默认true
    "withGenerator": true,// 是否需要显示编译信息(主要是编译日期和apidoc版本),默认true
    "aloneDisplay": false // 是否需要单独显示某个api,默认false
    }
  }
}
5、生成文档。
1
apidoc -i apisrc/ -o apidoc/
-i 输入目录 -o 输出目录
apisrc是ApiDocDemo代码所在目录
apidoc是网页文件的输出目录。
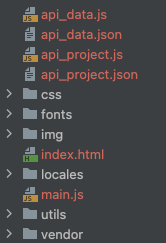
apidoc中会出现这样的一些文件,打开index.html就有你生成的文档了
至此一个简单的demo就完成了,证明本方案可行。
那么系统中成千上万的接口,我总不能手动去写注释吧?那么有没有一种模板,可以动态传参数并生成java文件呢?
freemarker生成模板文件
FreeMarker 是一款 模板引擎: 即一种基于模板和要改变的数据, 并用来生成输出文本(HTML网页,电子邮件,配置文件,源代码等)的通用工具。 是一个Java类库。
1、增加pom依赖
1
2
3
4
5
<!-- 引入freemarker模板引擎的依赖 -->
<dependency>
    <groupId>org.springframework.boot</groupId>
    <artifactId>spring-boot-starter-freemarker</artifactId>
</dependency>
2、配置application.properties
1
2
3
4
5
6
7
8
9
10
11
12
13
14
15
# 是否开启thymeleaf缓存,本地为false,生产建议为true
spring.freemarker.cache=false
spring.freemarker.charset=UTF-8
spring.freemarker.allow-request-override=false
spring.freemarker.check-template-location=true

#类型
spring.freemarker.content-type=text/html
spring.freemarker.expose-request-attributes=true
spring.freemarker.expose-session-attributes=true

#文件后缀
spring.freemarker.suffix=.ftl
#路径
spring.freemarker.template-loader-path=classpath:/templates/
3、定义模板文件
test.ftl
1
2
3
4
5
6
7
8
9
10
11
12
13
14
15
16
17
18
19
20
21
22
package com.taobao.rigel.rap.controller;
import java.util.Map;
public class ApiDocDemo {
/**
* @apiVersion ${apiVersion}
* @api {${method}} ${url} ${title}
* @apiGroup ${group}
* @apiDescription ${description}
* @apiSampleRequest off
<#list apiParamsList as apiParam>
    * @apiParam (请求参数) {${apiParam.type}} ${apiParam.field}=${apiParam.mock} ${apiParam.description}
</#list>
*
<#list apiSuccessList as apiSuccess>
    * @apiSuccess (响应数据) {${apiSuccess.type}} ${apiSuccess.field}=${apiSuccess.mock} ${apiSuccess.description}
</#list>
*
*/
public void doc() {
return doc();
}
}
4、编写路由ApiDocController.java
重点代码已隐藏,只展示测试类的处理step,其实原理就是按照test.ftl的关键字将值来put到dataMap中,最后通过template.process将dataMap输出到out目录中。
一个java文件,代表着一个接口,我这里采用时间戳的方式对每一个生成的java文件进行区分。
1
2
3
4
5
6
7
8
9
10
11
12
13
14
15
16
17
18
19
20
21
22
23
24
25
26
27
28
29
30
31
32
33
34
35
36
37
38
39
40
41
42
43
    @RequestMapping(value = "/shareApiDoc", method = RequestMethod.GET)
    public Map<String, Object> shareApiDoc(@RequestParam(value = "actionId") int actionId) {

        // step1 创建freeMarker配置实例
        Configuration configuration = new Configuration();
        Writer out = null;
        try {
            // step2 获取模版路径
            configuration.setDirectoryForTemplateLoading(new File(TEMPLATE_PATH));
            // step3 创建数据模型
            Map<String, Object> dataMap = new HashMap<String, Object>();
            //assemble apidoc base info
            dataMap.put("apiVersion", apiVersion);
            dataMap.put("method", requestType);
            dataMap.put("url", actionInfo.getRequestUrl());
            dataMap.put("title", actionInfo.getName());
            dataMap.put("group", page.getName());
            dataMap.put("description", actionInfo.getDescription());
            //get apiParamsList
            List<ApiParam> apiParams = new ArrayList<>();
            dataMap.put("apiParamsList", apiParams);
            //get apiSuccessList
            List<ApiParam> apiSuccess = new ArrayList<>();
            dataMap.put("apiSuccessList", apiSuccess);
            // step4 加载模版文件
            Template template = configuration.getTemplate("test.ftl");
            // step5 生成数据 output to apisrc directory
            File docFile = new File(fileSrc.getPath() + "/" + actionInfo.getName() + nowTime + ".java");
            out = new BufferedWriter(new OutputStreamWriter(new FileOutputStream(docFile)));
            template.process(dataMap, out);
        } catch (Exception e) {
            e.printStackTrace();
        } finally {
            try {
                if (null != out) {
                    out.flush();
                }
            } catch (Exception e2) {
                e2.printStackTrace();
            }
        }
        return null;
    }
apidoc文档分享实施方案
在实现之前首先对umeapi平台进行分析,对于接口的信息主要分为3部分。
- 接口的基本信息:如接口名称、接口请求类型、接口描述、版本号等等。
- 请求参数:变量名、备注、类型、mock数据、是否必须。
- 响应参数:变量名、备注、类型、mock数据、是否必须。
因此需要生成文档的三部分
- 接口基本信息
@api {type} path [title]定义api路径,以及形成左侧菜单的名称@apiVersion version定义api版本 version-版本号@apiDescription text定义api描述信息@apiGroup name定义api分组名称@apiSampleRequest urloff 调整示例请求的url,off代表关闭调试功能
- 请求参数
@apiParam [(group)] [{type}] [field=defaultValue] [description]定义参数-可以分组
- 响应参数
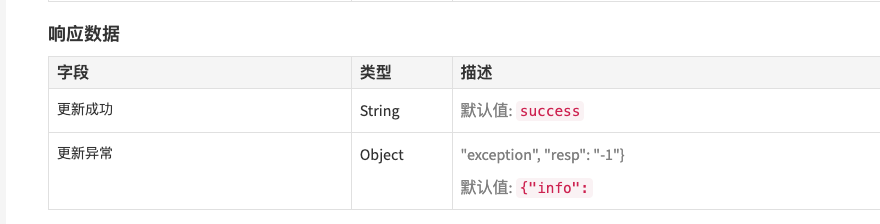
@apiSuccess [(group)] [{type}] field [description]定义返回的数据用法同@apiParam
这些是我所需要的参数,其他的更多参数放在文末。
resources新增目录结构
- apidoc
- projectId
- actionName+时间戳
- projectId
- outputdoc
- projectId
- 生成的文件
- projectId
- template
- 存放模板文件
- footer.md
- header.md
 graph TD
A[api文档分享] -->B[获取接口数据] --> C[根据模板生成java文件] -->D[根据java文件生成html]-->E[上传到服务器对应的目录中]
遇到问题及解决办法
1、umeapi数据与apidoc规则不兼容。
问题描述:
在请求和响应的字段中,apidoc默认字段名称为数字或英文。
但由于umeapi的接口使用不规范,很多都是中文字段名,因此导致生成文档时报错。
1
{"Block":3,"Element":"@apiSuccess","File":"app/routes/user.js","Source":"@apiSuccess {String}   错误提示","level":"error","message":"Empty parser result."}
解决办法:
读源码发现apidoc-core使用的是正则匹配的方式进行校验匹配,
修改源码node_modules/apidoc-core/lib/parsers/api_param.js
regExp下增加中文字符的匹配。
1
\u4e00-\u9fa5
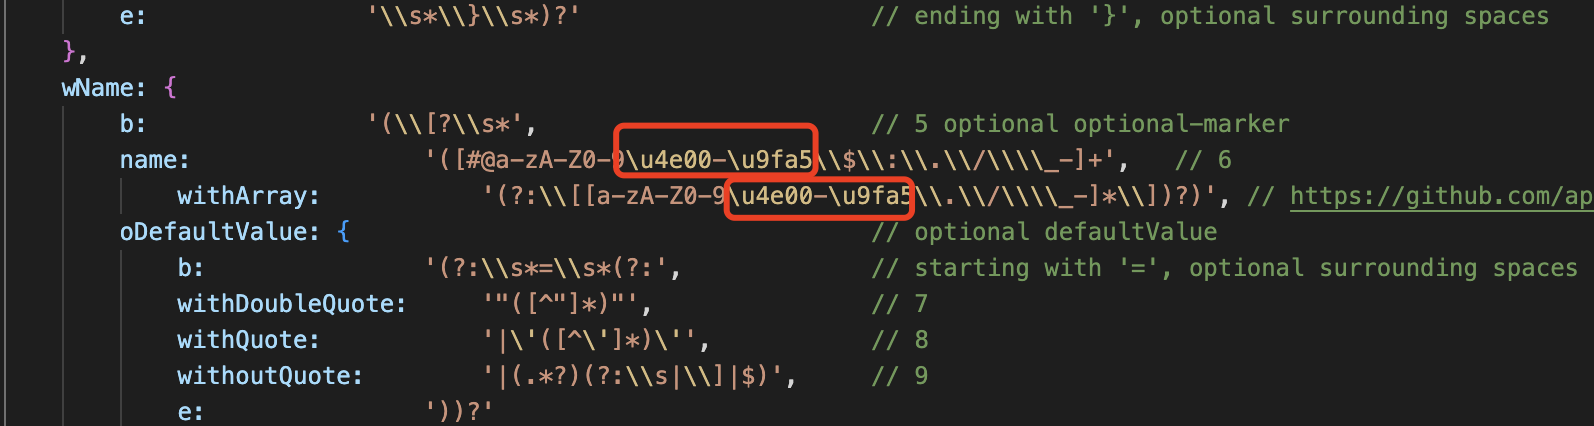
至此,解决了字段名称不能为中文的问题。
参考资料:
- 正则匹配教程https://www.runoob.com/regexp/regexp-tutorial.html
- 正则匹配测试https://regexr.com/
- 如何教你看懂复杂的正则表达式
2、存在不同的接口但是url相同,这个如何处理?
会粘连,无法导航。可能需要前端来配合。
- 影响范围:不影响单接口文档,影响工程下的所有文档,
实现方案:在前端js中修改name名称。
1
2
3
4
5
6
7
8
9
10
11
12
13
14
15
16
  // grouped by group and name
  var apiByGroupAndName = {};
  let entryName = new Set([]);
  var i=0;
  $.each(apiByGroup, function (index, entries) {
    apiByGroupAndName[index] = _.groupBy(entries, function (entry) {
        i++;
        if(entryName.has(entry.name)){

            entry.name=entry.name+i;
            entryName.add(entry.name);
        }
        entryName.add(entry.name);
      return entry.name;
    });
  });
完美解决!!
可通过设置
@apiName name定义api名称,因为名称基本都不同,所以可解决粘连的问题。
3、{Map[String, String]}类型无法兼容
修改源码:使得任何字符都可以匹配。
1
2
        type:                '([a-zA-Z0-9\(\)#:\\.\\/\\\\\\[\\]_\|-]+)', // 2
        type:                '(.+?)', // 2

4、发送示例请求无法关闭
一定要在配置中设置sampleUrl,否则注释中的@apiSampleRequest就不会生效,即使关闭了也不会生效。

之后设置为off即可关闭。
1
* @apiSampleRequest off
其他
apidoc 更多命令参数列表
| 参数 | 描述 |
|---|---|
| -h, –help | 查看帮助文档 |
| -f –file-filters | 指定读取文件的文件名过滤正则表达式(可指定多个) 例如: apidoc -f ".*\\.js$" -f ".*\\.ts$" 意为只读取后缀名为js和ts的文件 默认值:.clj .cls .coffee .cpp .cs .dart .erl .exs? .go .groovy .ino? .java .js .jsx .kt .litcoffee lua .p .php? .pl .pm .py .rb .scala .ts .vue |
| -e –exclude-filters | 指定不读取的文件名过滤正则表达式(可指定多个) 例如:apidoc -e ".*\\.js$" 意为不读取后缀名为js的文件 默认:'' |
| -i, –input | 指定读取源文件的目录 例如:apidoc -i myapp/ 意为读取myapp/目录下面的源文件 默认值:./ |
| -o, –output | 指定输出文档的目录 例如:apidoc -o doc/ 意为输出文档到doc目录下 默认值:./doc/ |
| -t, –template | 指定输出的模板文件 例如:apidoc -t mytemplate/ 默认:path.join(__dirname, '../template/')(使用默认模板) |
| -c, –config | 指定包含配置文件(apidoc.json)的目录 例如:apidoc -c config/ 默认:./ |
| -p, –private | 输出的文档中是否包含私有api 例如:apidoc -p true 默认:false |
| -v, –verbose | 是否输出详细的debug信息 例如:apidoc -v true 默认:false |
apidoc.json配置项
| 参数 | 描述 |
|---|---|
| name | 工程名称 如果apidoc.json文件中没有配置该参数,apidoc会尝试从pakcage.json文件中读取 |
| version | 版本 如果apidoc.json文件中没有配置该参数,apidoc会尝试从pakcage.json文件中读取 |
| description | 工程描述 如果apidoc.json文件中没有配置该参数,apidoc会尝试从pakcage.json文件中读取 |
| title | 浏览器标题 |
| url | api路径前缀 例如:https://api.github.com/v1 |
| sampleUrl | 如果设置了该参数,那么在文档中便可以看到用于测试接口的一个表单(详情可以查看参数@apiSampleReques) |
| header.title | 页眉导航标题 |
| header.filename | 页眉文件名(markdown) |
| footer.title | 页脚导航标题 |
| footer.filename | 页脚文件名(markdown) |
| order | 接口名称或接口组名称的排序列表 如果未定义,那么所有名称会自动排序 “order”:[ “Error”, “Define”, “PostTitleAndError”, “PostError” ] |
参考文档:
-
通过apidoc工具自动生成:https://apidocjs.com/ https://apidoc.tools/#usage
- 【ApiDoc】官方文档(翻译):https://www.jianshu.com/p/9353d5cc1ef8
- 使用apiDoc书写API文档规范https://www.jianshu.com/p/079a1c7ae1f2
- 模板美化:https://github.com/ahmed-dinar/apidoc-template
- https://juejin.cn/post/6844903871865847821
- nginx:https://www.yisu.com/zixun/585592.html
说在后面:
虽然用apidoc可以满足我们目前的需求,但总存在诸多不便。如:
- 框架束缚太严重,改动源码成本太高。
- 文档的模板较为固定,难以对文档做自定义的保存。
- 由于数据的规范问题,对个别接口字段的数据读取有误,难以数据保证100%的准确性。
因此又研究了一下基于markdown文档的docsify的技术。下篇文章介绍下这个更优雅的文档方案。